Introduction:
Every great idea starts somewhere. But turning that idea into something achievable can sometimes be the hardest part.
ai your plan brings together a simple Excel planning template and a series of AI prompts to help you turn your ideas into an actionable plan. Whether you’re managing a project at work, organising an event, launching a business or simply tackling something you’ve been putting off, this resource can help you identify what needs to happen, work through the steps and map out a realistic timeline.
You don’t need to be a project manager to use it. Bring your idea, your knowledge and a willingness to explore. AI can help you work through the details, while you remain in control of the decisions.
Get your planning template:
Download the free Excel template to get started. It’s designed to help you organise your activities, milestones and timeframes, giving you a visual overview of your plan.
Save the workbook somewhere you can easily find it. You’ll use it alongside the AI prompts below to gradually build your plan.
Step 1: Plan your plan
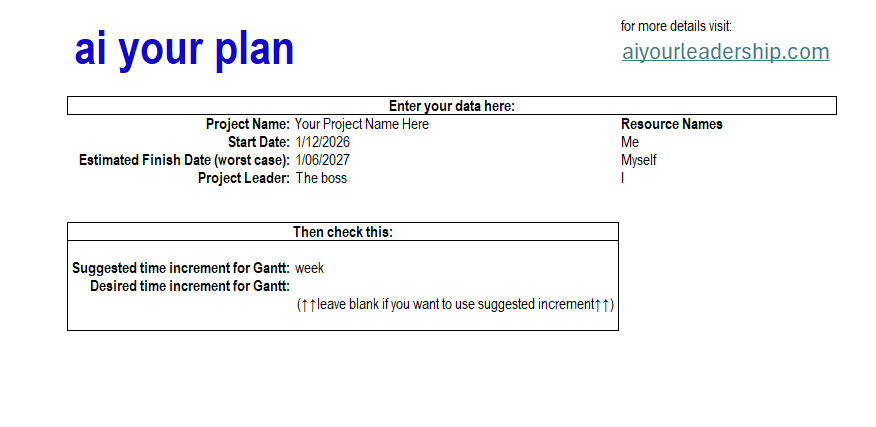
Before asking AI to help build your project plan, start by entering a few basic details in the Plan Your Plan tab of your Excel workbook.
You don’t need to have everything figured out yet. Just enter what you already know:
- Project Name: Give your project a name.
- Start Date: When do you expect to begin?
- Estimated Finish Date (worst case): What’s the latest date you could reasonably expect the project to finish? This gives you a timeframe to work within.
- Project Leader: Who is responsible for overseeing the project? This might be you!
- Resource Names: List the people who will be doing the work, including yourself if applicable. You can add or update these names later.
Then check your Gantt chart settings.
The workbook will suggest a suitable time increment for your Gantt chart based on your project dates. You can leave the Desired Time Increment field blank to accept this suggestion, or enter your preferred increment.
Don’t worry about getting everything perfect at this stage. You’ll have opportunities to review and refine your plan as you work through the next steps.
Step 2: Identify your work groups
Now that you’ve established your project’s basic details, it’s time to think about how the work might be organised.
Most projects can be divided into smaller, more manageable groups of work. These might be stages that follow one another, such as planning, preparation and delivery, or different areas of activity that happen alongside each other, such as communications, finance and operations. Sometimes, a combination of both works best.
Don’t worry if you’re not sure which approach suits your project. That’s where AI can help!
Use the prompt below to describe what you’re trying to achieve and ask AI to suggest a logical way to organise the work.
Review your suggested work groups
Look through AI’s recommendations and consider whether they reflect how you see your project coming together.
You can ask AI to combine, rename, remove or add work groups until you’re happy with the structure.
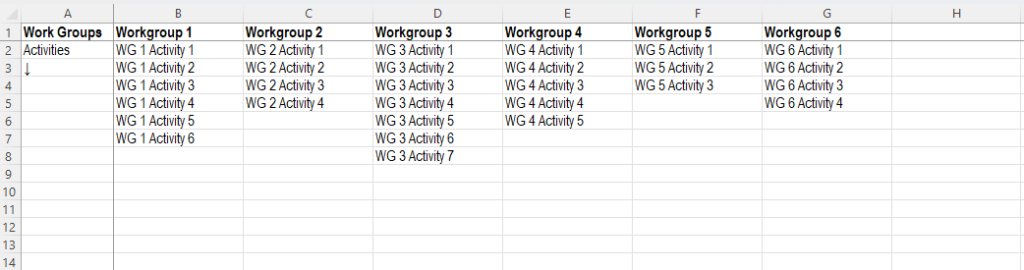
Once you’re satisfied, enter the agreed work group names into the top row of your Excel workbook.
Don’t worry about individual activities or timeframes just yet. We’ll work through those in the next step.

Step 3: Break your work groups into activities
Now it’s time to look more closely at what needs to happen within each work group.
Rather than trying to identify every activity yourself, use AI as a brainstorming partner. Together, you’ll explore what needs to be done, consider anything you might have overlooked and gradually develop a list of activities that makes sense for your project.
Work through one work group at a time, using the prompt below. This is a conversation, not a one-off exercise. You might agree with some of AI’s suggestions, reject others or suddenly remember something you’d forgotten to include. That’s all part of the process!
Take your time with this step. The more thoroughly you explore your activities now, the easier it will be to develop a realistic timeline later.
Don’t worry about dates, durations or dependencies just yet. For now, we’re concentrating on WHAT needs to be done, not WHEN it needs to happen.
Important note: Each work group can only have a maximum of 99 activities each.
Add your activities to Excel
Once you’re happy with the activities for your first work group, copy the final list into your Excel workbook, placing each activity in a separate cell beneath the corresponding work group heading.
Note: To get the activities copied nicely down the column, you may have to right-click and use Paste Special > As Text.
Repeat the process for each remaining work group, changing the work group name in the prompt each time.
Before moving on to the next step, look over your completed activity lists and consider whether anything is missing, duplicated or sitting in the wrong group.
My strong recommendation: Before moving on, ask AI to review your complete list of work groups and activities. Share a screenshot of your Excel worksheet, upload the workbook itself, or provide a cloud file link if your AI application has access to it.
Ask AI to identify anything you may have missed, duplicated or placed in the wrong work group. Review its suggestions and make any final adjustments before moving on to scheduling.
This time, try writing your own prompt. Think about what you want AI to review and what useful feedback might look like.
Once you’re satisfied, you’re ready to start turning your activities into a project schedule!
Step 4: Work out your dependencies
Some activities can’t begin until another activity has been completed. We call these dependencies.
For example, if you’re organising an event, you might need to confirm your venue before sending invitations. However, designing your invitations and organising catering could happen at the same time.
Understanding these relationships helps you organise your activities in a logical sequence, without unnecessarily delaying work that could happen in parallel.
Entering your dependencies
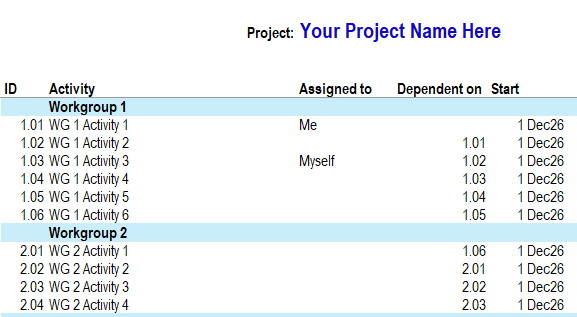
In your Gantt worksheet, use the dropdown in the Dependent on column to select the ID of the activity that must finish before another can begin.
For example, if activity 1.03 cannot begin until activity 1.01 is complete, select 1.01 from the dropdown.
A few things to remember:
- Dependencies can come from any work group, not just the one you’re currently reviewing.
- Not every activity needs a dependency. If an activity can begin independently, leave the cell blank.
- To keep things simple, this template allows one dependency per activity. If an activity relies on several others, identify the most relevant dependency and remember to check the additional requirements when reviewing your overall schedule.
Help AI understand your activity numbers
Your Gantt worksheet automatically assigns a unique ID to every activity. The prompt below explains how this numbering works, allowing AI to recreate your activity list using the work groups and activities you’ve already developed together.
If you’ve started a new AI conversation, you’ll need to provide your complete activity list again. You can copy and paste it from your Plan Your Activities worksheet or share a screenshot if your AI application supports images.
Before proceeding, check that AI has correctly matched every activity to its Excel ID. This will make entering your dependencies much easier!
Use the prompt below to work through your dependencies one work group at a time, while considering activities across your entire project.
A little tip: Your Gantt chart might look a bit strange at this stage, with activities appearing on the same date. That’s okay! We haven’t told Excel how long each activity will take yet. We’ll do that next, and that’s when you’ll really start to see your project timeline come together.
Enter your dependencies into Excel
Once you’re happy with AI’s recommendations, return to your Gantt worksheet.
Use the dropdown in the Dependent on column to select the agreed activity ID for each activity. The dropdown contains the activity IDs from your project plan, so there’s no need to type them manually.
Leave the cell blank if an activity can begin independently.
Repeat this process for each work group until you’ve reviewed all your project activities.
Don’t worry if your Gantt chart looks a little strange at this stage! We haven’t entered the activity durations yet, so the timeline won’t reflect your actual project schedule. That’s what we’ll tackle next.
Step 5: Estimate your activity durations
This is where your project plan really starts coming to life!
Now that you’ve identified your activities and their dependencies, it’s time to consider how long each activity will take.
Your Excel workbook has already determined a suitable time increment based on the project dates you entered in Step 1, or used your preferred increment if you selected one.
It’s important to use this same increment when entering your activity durations.
For example:
| Your selected increment | Enter your durations in |
|---|---|
| Hours | Hours |
| Days | Days |
| Weeks | Weeks |
| Months | Months |
If your timeline is configured in days, entering a duration of 5 means five days. If it’s configured in weeks, entering 5 means five weeks.
Your Gantt chart is also formatted to display the timeline using your chosen increment, so everything works together.
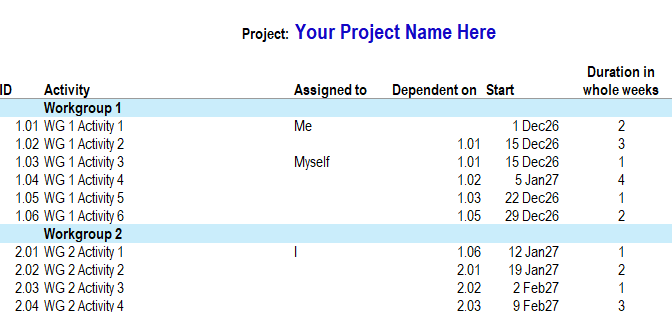
As you enter your estimates into the Duration column, the workbook will calculate the activity dates and you’ll begin to see your project schedule taking shape.
Remember, these are estimates. You don’t need to predict the future perfectly, but try to be realistic about how much time each activity will need.
A quick note about durations: Your workbook only accepts whole numbers. If your timeline uses weeks and an activity is expected to take three days, round it up to one week. If you find yourself rounding up lots of activities, consider returning to your Plan Your Plan tab and choosing a smaller time increment.
Watch your Gantt chart take shape!
Once you’re happy with your duration estimates, enter them into the Duration column of your Excel workbook.
Watch what happens to your Gantt chart as you enter each value! The workbook will automatically calculate the activity dates using your durations and dependencies.
Repeat this process for each work group until you’ve estimated all your activities.
Remember to use 0 for milestones, such as a particular approval or decision point, where no duration is required.
Once you’ve entered everything, take a moment to look at your emerging project timeline. Does anything surprise you? Are activities starting and finishing roughly where you expected?
Before moving on, use the Assigned to column to select who will be responsible for completing each activity. Your resource names are available in the dropdown list.
We’ll review the overall schedule in more detail shortly.
Step 6: Step back and review your plan
Congratulations! You now have a project plan! 🎉
Before you put it to work, take a moment to look at the bigger picture. Your Gantt chart brings all your activities, dependencies and durations together, giving you a visual overview of how your project might unfold.
Consider a few final questions:
- Does your project finish within the timeframe you originally allowed?
- Are there activities happening at the same time that might compete for the same people or resources?
- Do your dependencies make sense, particularly where an activity relies on more than one thing being completed?
- Are your duration estimates realistic, allowing for the time people actually have available?
- Have you identified who will be responsible for completing each activity?
You can also share your completed plan with AI and ask it to help identify potential scheduling conflicts, unrealistic assumptions or anything else worth reviewing. Remember, its suggestions are just that. You know your project and circumstances best.
Make any final adjustments, save your workbook and you’re ready to go!
And remember, your project plan is a living document. As work progresses, use the Progress column to record how your activities are tracking, review your timeline and make adjustments when circumstances change.

Make it yours:
Your plan is a starting point, not a set of instructions carved in stone. AI can help you organise your thinking, identify activities and build a timeline, but you know your circumstances, priorities and available resources better than it does.
Remember, you don’t have to follow every suggestion AI makes. Keep what adds value, change what doesn’t and make the final decisions your own.
The goal isn’t to create a perfect plan. It’s to create one that helps you move forward.
You don’t need to see every turn in the path to start moving forward. Now you have a plan to help you find your way. 💙

Love the prompts?

Find out about my project